
2026-10-22 · 9 min read
Gold Horse Head Cap and Striped Flank: Detail Work on a 0.4 m Factice
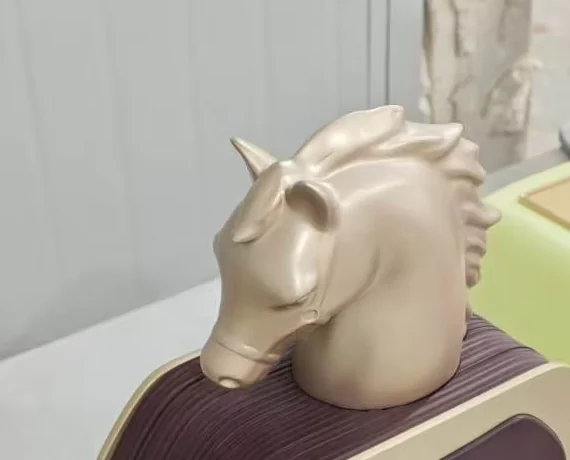
A horse's head is a bad shape to enlarge carelessly. The muzzle is thin, the jaw is wide, and the mane is a stack of separate plates, each one with its own thickness and roll direction. Scale the whole thing up by one factor and the mane turns into a lump while the muzzle goes blunt.
So the cap on this 0.4 m factice is cast as its own part. It is finished, plated and inspected away from the bottle body, and it only meets the body at the collar once the body is painted. The striped band below it is a separate problem with its own set of failures.
The cap is a cast part long before it is a gold part
Every relief on the head has a direction that has to be respected when the mould is split. The mane is the difficult zone: the rolled tips sit under each other, so a parting line placed on the outer face will tear the tip on release. We move the split to the back of the mane where the shadow already sits, so the line hides in a place the eye reads as a gap between plates.
After demoulding the part is filled, sanded and checked. Three areas are unforgiving: the ear cavity, the nostril, and the eye socket. On the original bottle these are shallow mouldings. If the depth is carried up by the same percentage as the length, they read as holes. If it is not, the ear becomes a dimple. They get re-cut by hand, and the hand work has to be re-checked from the side, not the front.
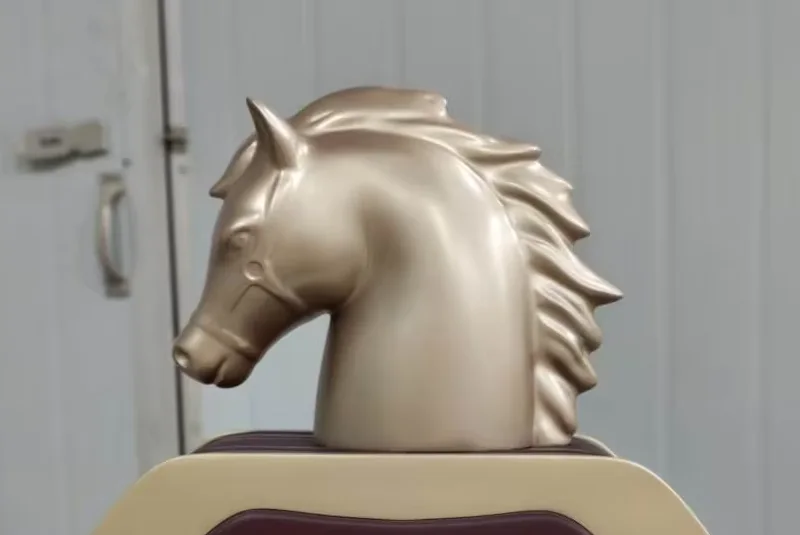
The mane has to read at three metres, not at thirty centimetres
A retail prop is looked at from roughly one to three metres. Nobody stands nose to nose with it, and the buyer's photographs are usually taken from further back than that. This changes what "accurate" means. The mane plates need a front edge with real thickness, because a plate with no edge stops catching light from the side and turns into a printed outline.
The opposite failure is just as common. Thicken every plate so it survives distance, and up close the mane looks like a row of blunt blades. There is no setting that satisfies both readings, so we pick the distance the piece will actually be seen from and shape for that. If your display is a counter piece at arm's length, tell us, because the shape should change.
Gold amplifies whatever is underneath it
Metallic finish is a mirror with a colour tint. A wave in the casting, a sanding scratch, the edge of a patch of filler, all of it comes back at the viewer once the metal layer is on. This is why the surface work is finished and signed off before any gold goes near the part. Once the metal is down, the only fix is to strip it back and start the surface again.
This particular piece is finished in a satin gold rather than a mirror gold. Satin is the more forgiving choice: it still shows a wave, but it does not turn a fingerprint into a headline. The trade-off is that satin flattens volume a little, and the mane relies on a highlight running along each plate to separate them. A mirror finish separates the plates harder, and then punishes anyone who touches the piece.
That is the practical cost of gold on a display prop. It will be handled. Staff move it, customers reach for it, and every contact leaves a mark on a satin surface. A shop that wipes it with a general-purpose cleaner will dull the coat faster than a shop that dusts it with a dry microfibre cloth. If the piece is going at hand height in a busy store, say so and we will quote a matte clear coat over the gold instead.
The striped flank is moulded, not printed
The ribbed band wrapping the outer edge of the bottle is the part most replicas get wrong. It is not a printed stripe, a vinyl wrap, or a texture rolled into paint. On the original bottle the ribs are moulded into the container wall, which is why they follow the curve of the flank instead of sitting on top of it.
The detail that gives a copy away is spacing. Laid out at equal distance on a flat plane, the ribs will crowd together as the surface turns away from the viewer and open up at the front. On the real bottle the ribs are set by angle around the curve, so the gap between them widens naturally towards the outer edge. We build the spacing the second way. It is slower to lay out and it is the difference between a band that looks machined and one that looks combed.
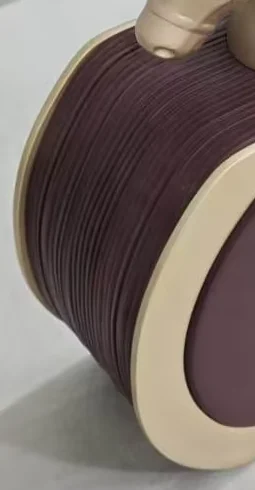
Paint is the second half of the job. Spray settles into the grooves and stays thin on the tops of the ribs. Push the film thickness to get an even colour and the ribs round over, and the band reads as a matte panel from three metres out. Keep the film thin and the colour drifts between batches. We spray the band in passes, check the rib profile under raking light between passes, and stop while the edge is still sharp.
The end of the band is masked by hand. The ribs finish against a pale edge band, and any mist that creeps onto that band shows up as a dirty halo around the flank. Masking tape alone does not hold the line on a curved return, so the boundary is cut back after unmasking.
Three colours off one set of tooling
The batch photograph below is the useful argument for casting these as separate parts. The same head and the same ribbed band come out in burgundy, green and blue, because the shape lives in the tooling and the colour lives in the paint. A repeat order in a new brand colour does not need a new mould.
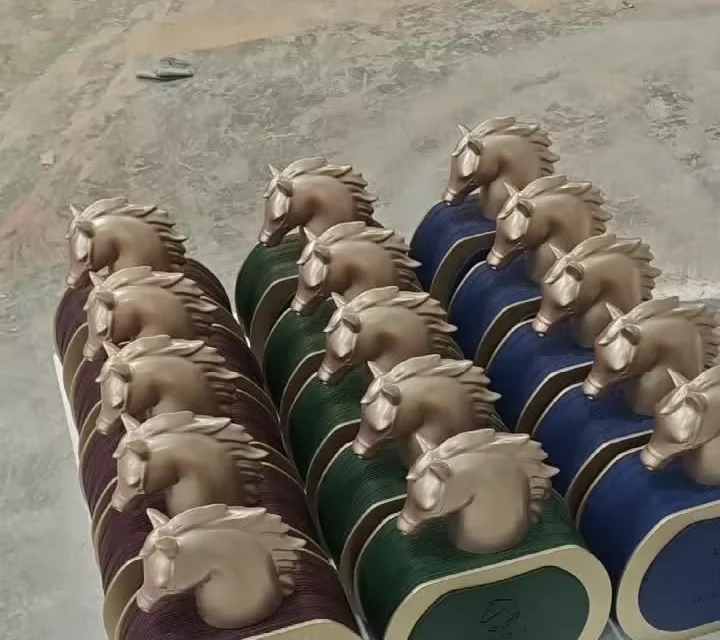
Colour does change how the ribs read, though. On the burgundy and the green, side light drops into the grooves and the band looks deeper than it is. On a pale or a metallic body colour the same ribs flatten out and the band can look almost smooth at distance. If you are choosing a light colour, expect to gain rib depth to keep the effect.
Where this build stops
Four hundred millimetres is close to the economic point for this amount of detail. Take the same head to 1.4 m and the mane plates cannot simply be scaled: each plate carries its own weight, and a thin plate that reads correctly at 0.4 m will sag or drum at 1.4 m. The plates get re-thickened, the hollow behind them gets a core, and the part stops being a straight enlargement of the small one.
The ribbed band has its own limits. Grooves collect dust, and a shop that cannot reach into them will watch the band go grey. For a street-facing window or any outdoor placement we would steer you to a smooth flank instead. The satin gold is the other constraint: high-touch positions lose their sheen first, and no coating we apply makes that go away.
Finally, the body is a shell. It is not structural, it does not open, and it is not a container. If the display has to double as storage or carry a lit sign, that is a different build with a different internal frame.
What we need before mould work starts
Send straight-on front, side and top photographs of the bottle with a ruler in frame, plus the height you want. Add a physical or approved colour reference for the gold, because a screen colour is not a finish standard and we will not match to one. If the original bottle has ribs, tell us whether the rib spacing has to stay exactly as it is or whether it can be redistributed for the new height.
We come back with a section drawing of the cap and the flank before any tooling is cut. Minimum order is from 1 piece, sampling runs around 15 days, and production runs 20-30 days, depending on order quantity.
This article covers the cap and the flank only. For the measurement, structure and label side of the same family of builds, readhow we reproduce a giant perfume bottle, and for the plating and label work on a flocked body seethe metalwork on a 0.4 m flocked factice. Product sizes and finishes are listed underfactice perfume bottles.
Working from a bottle that is already in production? Photograph it on a plain surface, put a steel rule against the height, and send the three views through ourcontact page. We will tell you which details will survive the enlargement and which ones we would change.